Network Shared Drive Data Sources
A Network Shared Drive data source enables you to enrich your KB with internal documents, policies, or FAQs, improving the accuracy and comprehensiveness of your AI Agent responses. By incorporating Network Shared Drive data sources, you will extract paragraphs from Excel, Word, and PDF files stored on your network.
Druid supports adding and extracting data from the following storage types:
- Local File: Extract data from files located on the same machine as the KB Agent.
- Local Share: Access and process information from files stored on a shared drive within your network, accessible to the KB Agent.
- FTP: Integrate data from an FTP server using TLS implicit encryption (for cloud deployments only).
-
SFTP: Integrate data from an SFTP server using TLS implicit encryption (for cloud deployments only).
This section will guide you through the process of adding data from network shared drive to the KB:
Step 1: Create the data source
To begin, follow the step-by-step instructions in Data Source Creation. In the Add New Data Source modal, follow these instructions to create a data source based on your storage type.
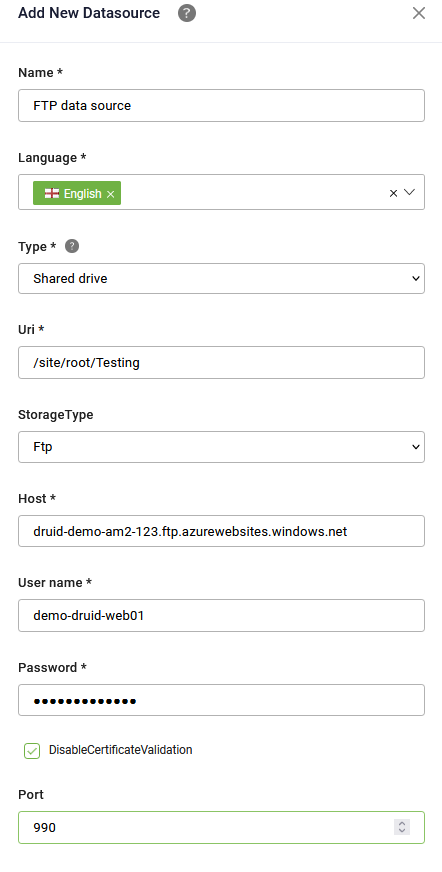
 FTP storage
- From the Type dropdown, select Shared drive.
- Select FTP as Storage Type.
- In the Uri field, enter the relative path to the folder (on the FTP server) you want to crawl.
- In the Host field, enter the host name of the FTP server.
- Enter the FTP login ID (User name) and the FTP login password (Password).
- Select the Data connection type from the dropdown.
- If the FTP server uses a self-signed certificate or one not issued by a recognized Certificate Authority, select Disable Certificate Validation. Failure to do so will result in unsuccessful data crawling and extraction.
- Enter the FTP Port for data transfers.
- To verify the FTP credentials, click the Test button. If the check fails, check and review the FTP credentials to ensure they are correct. You can also verify the FTP credentials later by going to the Details tab of the data source and clicking the Test button at the bottom of the page.
- Click Create.
SFTP storage
To create data sources from SFTP storage via TLS implicit encryption:
- From the Type drop-down, select Shared drive.
- Select SFTP as Storage Type.
- In the Uri field, enter the relative path to the folder (on the SFTP server) you want to crawl.
- In the Host field, enter the host name of the SFTP server.
- Enter the SFTP login ID (User name) and the SFTP login password (Password).
- Enter the SFTP Port for data transfers.
- To verify the SFTP credentials, click the Test button. If the check fails, check and review the SFTP credentials to ensure they are correct. You can also verify the SFTP credentials later by going to the Details tab of the data source and clicking the Test button at the bottom of the page.
- Click Create.
Local file storage
To create data sources from the local machine where the KB Agent is installed:
- From the Type drop-down, select Shared drive.
- Select Local File as Storage Type.
- In the Uri field, enter path to the local folder you want to crawl. To get the path, go to the desired folder and from Windows explorer, copy the folder path.
- Click Create.
Local share storage
To crawl and extract data from files stored on the shared drive within your network, accessible to the KB Agent:
- From the Type drop-down, select Shared drive.
- Select Local Share as Storage Type.
- In the Uri field, enter the shared drive file path the KB Agent can access.
- Click Create.
Step 2. Crawl the data source
The data source configuration page appears by default on the Extracted paragraphs tab. The content of the root reflects the file structure from the Uri link you provided during data source creation. By default, all folders and files are excluded from scraping. To include files / folders for scrapping, hover the mouse over the desired item in the tree, click the Actions menu (the three dots) and select Include.
Click the Crawl button at the top-right corner of the page. In the Start Crawling Parameters modal, define the crawling policy by setting the parameters described in the table below.
| Parameter | Description |
|---|---|
| URL | Automatically populated with the Uri (or the Host for FTP storage) you specified when adding the data source. |
| Depth |
The number of directory levels the crawler will explore from the URL. NOTE: To improve crawling efficiency, crawl each node individually instead of the entire root, especially if the storage has a deep structure. Set the depth to '0' to achieve this.
|
Click Start.
To crawl specific nodes, click the dots next to the desired node in the file repository explorer and select Crawl Path.
When the crawling completes, the extracted articles display under the Extracted paragraphs tab.
Step 3. Train the data source
To ensure the KB Engine searches through the data source paragraphs, train your data source by clicking the Train button at the top-left corner of the data source or select Train data source from the actions menu. Alternatively, you can Train all data sources.
Related Topics